Overview
Welcome to OpenSAT 2020
If you have logged in for the first time, you have just created an User account that is controlled by you and should see the Participants Dashboard page.
This help section describes the rest of the registration process and then leads to the next section of making a submission to the scoring server.
Users, Sites and Teams
Depending on the evaluation type the Entity submitting results to the platform or for example handling dataset licenses can either be represented as:
- a User (using your Email or User Profile Information)
- a Site (a group of Users) or
- a Team (a group of Sites)
Workflow
As the registration process can differ between evaluations, a workflow card guides through the registration process. Please follow the steps in sequence as they appear green on the workflow card.

Editing Account Information and User Profile
Some Evaluations require you to complete your User Profile in order to collect evaluation relevant information. If you do not see an entry in your workflow to update the user profile you can disregard this section.
To edit your User profile either visit the
Workflow link or alternatively click on your
email-address on the top right and select
User Info. This will load the User Info Page:
- Press the
Edit User Profilebutton on the right. - On the profile page, please fill in your information for all fields.
- Press
Submit
Creating and Joining Sites
Site Ownership
The first step is to become a member of a
Site. This can be for example your
Laboratory-, Faculty- or a
Company-name. Becoming a member of a Site can
be done by either creating a new Site
or joining an existing Site created by
your Site-Lead. If you wish to represent your
Site please create it. You will become the
owner of the Site. To do so follow the
Create/Join a Site link in the
Workflow which will take you to the Site Management page:

Site Management Page
Please click the Create New Site button to the right on the Site Management card.

New Site Page
On the Site creation page please provide the
site name, description and password (your
site password, which will allow collaborators
to join your site in order to make a
submission). Please provide at least 6
characters for the password. After reviewing
your information click the Create
Site button to create the Site.

Join Site Page
Section missing
After creating a Site, follow the same procedure to create a Team.
Creating and Joining Teams
Team Ownership
If you have joined a Site you are likely part of a Team already (or will become part of a Team as soon as the Site Lead creates one). In this case please skip this section.
In Team based Evaluations you must
create or join a Team. This might be your Site-/Project-name
in case you are not collaborating, otherwise it
might be the name of a Project on which multiple
Sites are working together.
To create a Team user the Create/Join a
Team link in the Workflow which will take you to the Team Management Page:

Team Management Page
Please click theCreate New Team button to the right on the Team Management card.

New Team Page
On the Team creation page please provide the
team name first. Then choose a Site which the Team will be part of. Then enter description and password (your
team password, which will allow collaborators
to join your team in order to make a
submission). Please provide at least 6
characters for the password. After reviewing
your information click the Create
Team button to create the new Team.

Join Team Page
Section missing
Managing Licenses
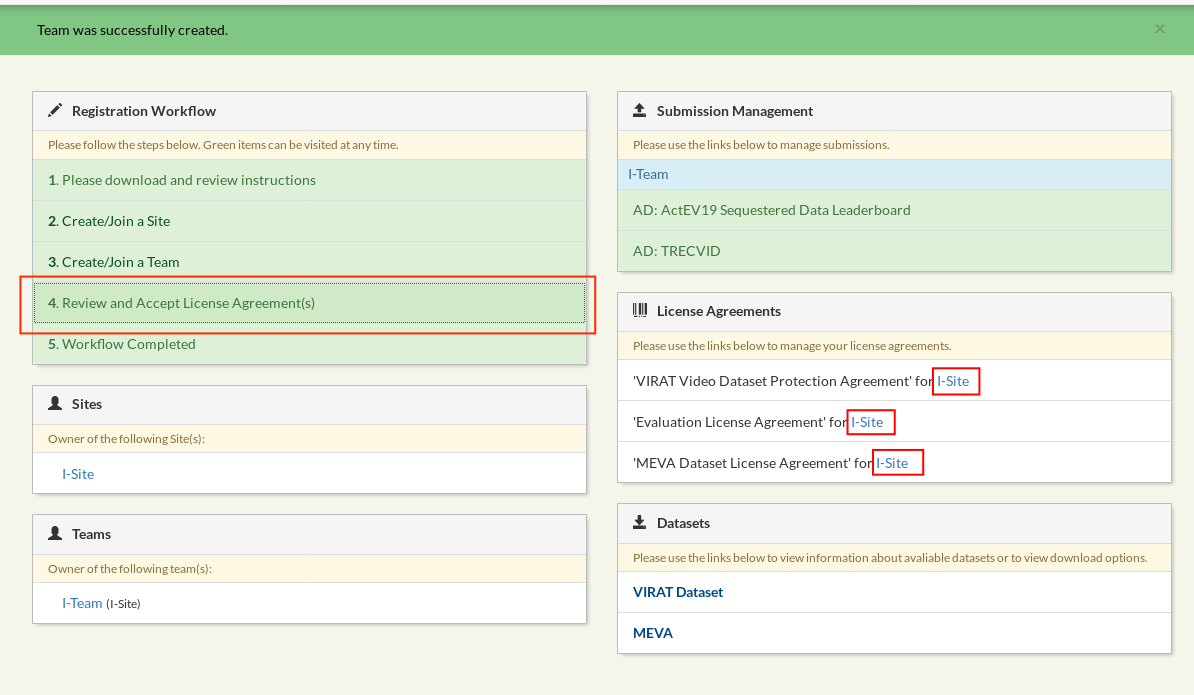
After a Team has been successfully created,
the Platform will subscribe that team to all
the current evaluation Tracks, as well as
automatically create License
Agreements. Please review the agreements
by either following the Review and
Accept License Agreement(s) link in the
Workflow Panel, or by clicking on your team
license links under the License Agreements
card:

Please download any relevant license agreement or evaluation plan, review it and then click ‘Review’ to enter the license review card:

In order to accept the license please click the CHECKBOX and then press the ‘Update License Agreement’ button:

Once the license have been acknowledged, you will be able to access the dataset instruction card with download information (and decryption keys if applicable). See next section.
Evaluation Tasks and Task Registration
Your system submissions are tied to a specific Task. A task can be composed of multiple Phases, for example a Dryrun phase and a Main Evaluation Phase, or an evaluation with multiple staged Checkpoints. In order to make a submission any Entity must be registered to at least one Task. This registration process can be done either automatically as per Evaluation setup or might have to be performed manually.
To register to a new track: Click
on the Register for a
Track button on the workflow
card to get to the registration
page:

On the Registration Page, select the
respective Entity - Track combination
and click Create entity system participation button to
finish the registration.

Accessing Datasets
After completing the license agreement, credentials and instructions to access the data will be available by clicking the links on the Datasets section of the web site.

